This tutorial explains, how to create services block as show in demo.
Step 1:
Navigate to:
Home Administration Structure Block layout
example.com/admin/structure/block
Step 2
Click Custom block library tab and then + Add custom block

Step 3:
Disable CKEditor editor and select Full HTML as input format.
But we recommend to create and use a new text input format like Full HTML but without CKEditor editor as explained here: Create a new Text Format without CKEditor in Drupal 8

Step 4:
Let us first create a row.
Services should be placed within a div of class full.
<div class="full">
	-- Your Services Here --
</div>
You can place one / two / three / four ... services in a row.
Let's create 3 columns for three services.
Create three div of class item.
<div class="full">
  <div class="item">
    Column for Service One
  </div> <!--/ End item One -->

  <div class="item">
    Column for Service Two
  </div> <!--/ End item Two -->

  <div class="item">
    Column for Service Three
  </div> <!--/ End item Three -->
</div>
Each service should be placed within a div of class service.
<div class="full">
<div class="item">
<div class="service">
Your Service one
</div> <!--/ End service One -->
</div> <!--/ End item One -->
<div class="item">
<div class="service">
Your Service two
</div> <!--/ End service two -->
</div> <!--/ End item Two -->
<div class="item">
<div class="service">
Your Service three
</div> <!--/ End service three -->
</div> <!--/ End item Three -->
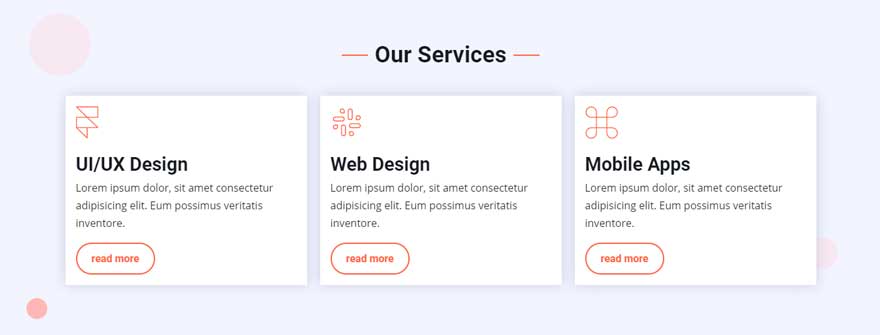
</div>Use below sample code to create services block as shown in demo.
<div class="full">
  <div class="item">
    <div class="service">
      <div class="service-icon"><img src="/images/demo-images/icons/service/service1.svg" alt="service icon" /></div>
      <h3>UI/UX Design</h3>
      <p>Lorem ipsum dolor, sit amet consectetur adipisicing elit. Eum possimus veritatis inventore.</p>
      <a class="button-link" href="#">read more</a>
    </div> <!--/ End service One -->
  </div> <!--/ End item One -->

  <div class="item">
    <div class="service">
      <div class="service-icon"><img src="/images/demo-images/icons/service/service2.svg" alt="service icon" /></div>
      <h3>Web Design</h3>
      <p>Lorem ipsum dolor, sit amet consectetur adipisicing elit. Eum possimus veritatis inventore.</p>
      <a class="button-link" href="#">read more</a>
    </div> <!--/ End service two -->
  </div> <!--/ End item Two -->

  <div class="item">
    <div class="service">
      <div class="service-icon"><img src="/images/demo-images/icons/service/service3.svg" alt="service icon" /></div>
      <h3>Mobile Apps</h3>
      <p>Lorem ipsum dolor, sit amet consectetur adipisicing elit. Eum possimus veritatis inventore.</p>
      <a class="button-link" href="#">read more</a>
    </div> <!--/ End service three -->
  </div> <!--/ End item Three -->
</div>
Edit above code to change service icon, service name, description and button url.
How to change service icon
you can use any image or font icons. Following font icons are included in Vani theme.
Step 5
Now place this new block in Homepage content region.

You can use above sample code to create similar content for other block regions or in other pages. Like you can create a services page with same above sample code.
example.com/services